

Contents
The goal of this quick reference is to bring attention to .Net based Docker images and optimizing their sizes in an image store. We will create a “Hello World” program, build it into a Docker image then optimize the Docker image for its final size. We’ll also perform some cleanup operations.
Prerequisites:
- PowerShell
- Basic working knowledge of Docker
- Configured Docker environment. You can download Docker Desktop for Windows.
Part 1: Hello World Program in C#
Type the following in your PowerShell window.
cd /
mkdir dockerExamples
cd dockerExamples
dotnet new console --name HelloWorld
ls HelloWorld
Your PowerShell window should look something like this:
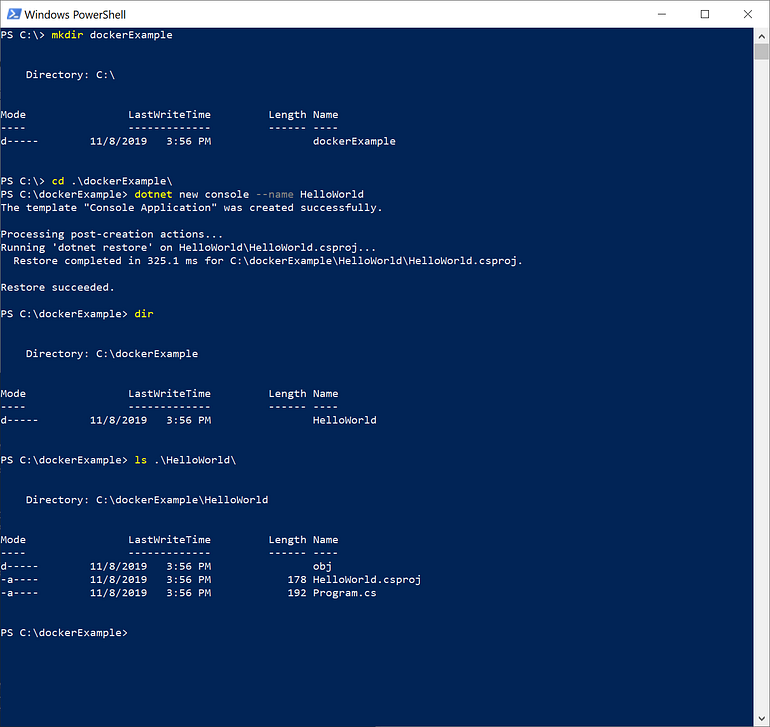
We have created a directory for our example to live named dockerExample, changed our working directory to /dockerExample, created a new .net core console application called HelloWorld and listed out the contents of the directory “HelloWorld”.
Now let’s add a few lines of code to the HelloWorld/Program.cs file. You can edit this file with your favorite text editor. For our example, we’ll use notepad.
Type the following command in your PowerShell window:
clear
cd HelloWorld
notepad Program.cs
In the open Notepad window, type the following lines of code, save the file then close the file.
using System;
using System.Threading;
namespace HelloWorld
{
    class Program
    {
        static void Main(string[] args)
        {
            Console.WriteLine("Hello World! Going to sleep for 10 seconds now.");
            Thread.Sleep(10000);
            Console.WriteLine("Good bye!");
        }
    }
}
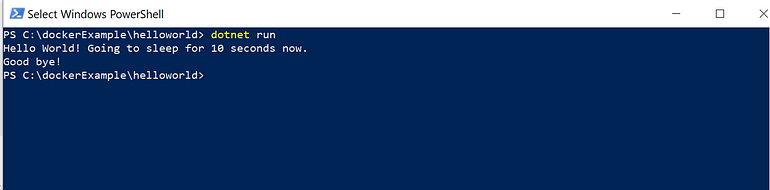
Let’s run the program. Type the following lines in your PowerShell window:
clear
dotnet build
dotnet run
Your PowerShell window should look something like this:
Part 2: Build your program into a Docker Image using a Dockerfile
Let’s create a Docker file which we will use to build our Docker image.
Type the following lines in your PowerShell window:
clear
new-item Dockerfile
notepad Dockerfile
In the open notepad window, type the following:
# Use an official microsoft SDK as a parent image
FROM mcr.microsoft.com/dotnet/core/sdk:2.1 AS build-env

# set our working directory to /app
WORKDIR /app

# copy the working directory contents into the container at /app
COPY . .

## build and put files in a folder called output
RUN dotnet build -o output

# set out working directory to output
WORKDIR output

# copy files from output into the container
COPY . .

## Once the container launches, run the HelloWorld program
ENTRYPOINT ["dotnet", "HelloWorld.dll"]
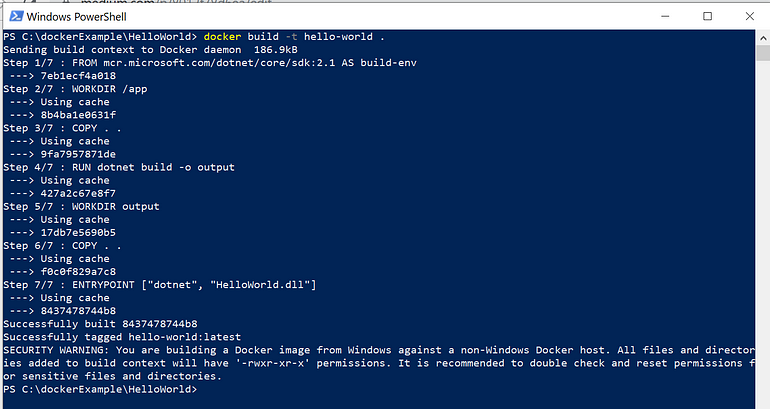
Save the file. In your PowerShell window type the following:
clear
docker build -t hello-world .
The commands clear the PowerShell window and builds your image. We have used the -t option to give our image a friendly name we’ll use later. Your PowerShell window should look something like this:
Now type the following to run your image in a container.
clear
docker run --name hello-world hello-world
Your PowerShell window should look something like this:

Perfect! We have a running hello world program in a Docker container.
On a side note, the --name hello-world is an optional flag added to name our container. We’ll use this name later during clean-up.
Part 3: Image Size and Optimization
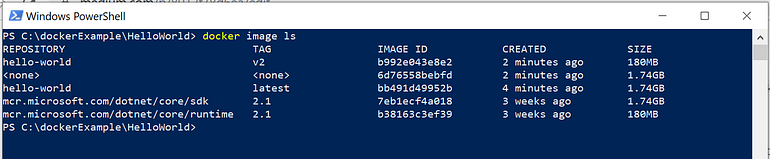
In parts 1 and 2, we created a hello world program and containerized it. Now we will look at the image size and optimize it. Type the following command in your PowerShell window:
clear
docker image ls
Your PowerShell window should look similar to below:

Pay close attention to the size of our hello-world image. It’s a whopping 1.74 GB. That’s a large hello-world program! You also notice the size of the SDK image.
Examine our Dockerfile, we notice we are building off the SDK image as a base for our image. Look at the line:
FROM mcr.microsoft.com/dotnet/core/sdk:2.1 AS build-env
We need this to build our image but we can use a slimmer image as a base for our runtime. We only need the runtime components to run our program.
With the advent of Docker multi-stage builds, we can do this in a single Docker file. First, we’ll build our image using SDK then we’ll copy the build files to a new image using only the runtime components needed to run the program. This technique ultimately reduces the size of the final image thereby optimizing our storage space utilization.
Let’s update our Dockerfile to the following:
# Use an official microsoft SDK as a parent image
FROM mcr.microsoft.com/dotnet/core/sdk:2.1 AS build-env

# set our working directory to /app
WORKDIR /app

# copy the working directory contents into the container at /app
COPY . .

# build and put files in a folder called output
RUN dotnet build -o output

# Build runtime image. Note use of runtime version of core image to reduce size of final image
FROM mcr.microsoft.com/dotnet/core/runtime:2.1 AS runtime-env
WORKDIR /app
COPY --from=build-env app/output .

# Once the container launches, run the HelloWorld program
ENTRYPOINT ["dotnet", "HelloWorld.dll"]
Now let’s rebuild our image. Type the following in your PowerShell window:
clear
docker image build -t hello-world:v2 .
Notice we have changed the name of the image to hello-world:v2. More specifically, we have added a tag to the image name to differentiate it from our previous image.
Now let’s see what we have. Type the following in your PowerShell window:
clear
docker image ls
Your PowerShell window should look something like this:
You notice we have a hello-world with a tag v2 and a hello-world with a tag latest. The former is our new image which is considerably smaller at 180 MB than the latter. That’s about a 90% reduction in the size of our image. You also notice the runtime image is significantly smaller than the SDK image. It is useful to use runtime images as bases for our final image instead of the SDK.
Run the optimized image and you’ll see we have the same result. Type the following:
docker run --name hello-world2 hello-world:v2
Part 4: Clean-up
As we optimize space, we should also clean up unused and exited containers and dangling images. What are dangling images? These are layers that have no association with any tagged images and consume space in your storage.
Let’s look at the containers first. The following command will list out all the exited containers:
docker container ls -f status=exited
Now if you’ve run the hello-world program a few times, you will find that there a just as many exited containers. If you are in a shared environment, you may find other exited containers that other individual may still have use for. You can further filter your results as follows:
docker container ls -f status=exited -f name=[name of your container]
In our example, [name of your container] would equal hello-world, the name we gave the containers when we ran the images.
If we only had a few of these exited containers to clean-up, we can do the cleanup on at a time. The command below however gets all affected containers and deletes them altogether:
docker container rm $(docker container ls -f status=exited -f name=[name of your container] -q]
You notice we’ve added the -q flag to our original command to list all the exited containers. This gets us only the IDs of the containers which are then passed as arguments to the rm command to delete said containers. This approach gives us a little more control over which containers we delete. To illustrate the above, follow the below:
clear
docker container ls -f status=exited
docker container rm $(docker container ls -f status=exited -f
name=hello-world -q)
docker container ls -f status=exited
results of the above commands
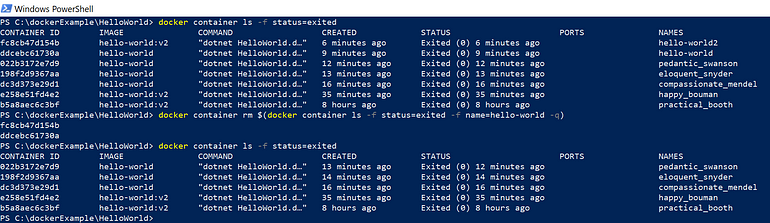
You notice we have successfully deleted only the hello-world named containers.
NOTE: docker container prune command also removes exited containers but you have a degree less control over which containers you filter for deletion.
Now, using the same principles as above, we can clean up dangling images. We can also use this same method to remove other selected images. It is far more likely though that we want to keep our named images so we can run it again at a later date.
Type the following commands in your PowerShell window:
clear
docker image ls

The highlighted line is a dangling image. Type the following command to single it out:
docker image ls -f dangling=true
Over time it is common to have several of these dangling images occupy space in our storage unless they are actively removed. Use any one of the following commands to clean-up dangling images: docker image rm $(docker image ls -f dangling=true) You can also use:
docker image prune --force
It’s always a good idea to remove containers that have exited first before removing dangling images. This ensures fewer errors and removes more would-be dangling images as the associated containers are removed.
Part 5: Conclusion
Although storage is ubiquitous today, we should practice good computer science principles and ensure we keep our storage as clean as possible - essentially remove the garbage.
Share this article: