Map Menus Add-on
Contents
These menus allow the map user to control aspects of the visualization at runtime.
CDN Example
View a working demo and follow the steps below to create your own
<script src="https://maps-sdk.trimblemaps.com/addon/trimblemaps-mapmenus-2.2.2.js"></script>
<!-- Map Menus addon reference js -->
<link href="https://maps-sdk.trimblemaps.com/addon/trimblemaps-mapmenus-2.2.2.css" rel="stylesheet">
<!-- Map Menus addon reference css -->
First initialize your map
TrimbleMaps.setAPIKey("YOUR_ACCESS_TOKEN");

const myMap = (window.map = new TrimbleMaps.Map({
  container: "map",
  zoom: 12.5,
  center: new TrimbleMaps.LngLat(-77.01866, 38.888),
}));
The Map Menu Options object allows you to control which features are enabled on the menus. In this example, we enable the base styles provided by Trimble Maps as part of the SDK, but we hide certain styles. We also remove/hide specific layers. This doesn’t hide the layers themselves, but prevents the user from controlling those layers using the menu. This may be useful in cases where the application designer/developer wants to control the visibility of certain layers but allow the user to turn on or off others.
mapMenusOptions = {
  showBaseStyles: true,
  hideStyles: ["Accessible Dark", "Accessible Light", "Basic"],
  hideLayers: ["Weather Cloud", "3D Buildings"],
};
Initialize the map menu control with the specified options and add it to your map
mapMenusControl = new TrimbleMapsControl.MapMenus(mapMenusOptions);

// Map#addControl takes an optional second argument to set the position of the control.
// If no position is specified the control defaults to `top-right`.

myMap.addControl(ctrl, "top-left");
Module Bundler Example
Install the npm package.
npm install --save @trimblemaps/trimblemaps-mapmenus
Make sure the CSS file is included in the page, either by adding it to the <head> of your HTML file or importing it with your bundler.
Next, import and use the JS module in your code.
Note: Since the add-ons are published in separate packages, the modules in each package are exported individually. You will import each module directly, rather than using a single namespace variable of TrimbleMapsControl, which is shown above in the CDN example.
import TrimbleMaps from "@trimblemaps/trimblemaps-js";
import MapMenus from "@trimblemaps/trimblemaps-mapmenus";

TrimbleMaps.setAPIKey("YOUR_KEY_HERE");

const myMap = new TrimbleMaps.Map({
  container: "map",
  zoom: 12.5,
  center: new TrimbleMaps.LngLat(-77.01866, 38.888),
});

const ctrl = new MapMenus({
  showContentLayers: false,
});

myMap.addControl(ctrl, "top-left");
Customization Options
| Parameter Name | Type/Values | Description |
|---|---|---|
showWeatherLayers |
Boolean |
Default: true Show or hide the Weather Layers control. |
showContentLayers |
Boolean |
Default: true Show or hide the Content Layers control. |
showBaseStyles |
Boolean |
Default: true Show or hide the default styles shipped with the SDK. |
showCustomStyles |
Boolean |
Default: false Show or hide any custom styles created using the Map Toolbox(Coming Soon). |
showMobileStyles |
Boolean |
Default: false Show or hide the mobile styles that are shipped with the SDK. |
hideLayers |
Array of strings |
Default: [] List of layers to exclude from the menu. |
hideStyles |
Array of strings |
Default: [] List of styles to exclude from the menu. |
Weather Customization
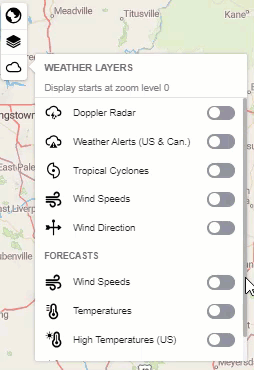
The Weather Layers menu can be customized by using hideLayers to hide from the menu the layers you don’t want to display.
The default menu includes:
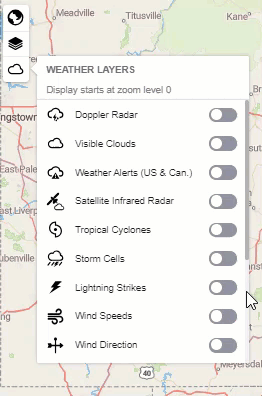
Layers that can be hidden: Doppler Radar, Visible Clouds, Weather Alerts (US & Can.), Satellite Infrared Radar, Tropical Cyclones, Storm Cells, Lightning Strikes,Wind Speeds, Wind Direction, Temperatures, High Temperatures (US), Low Temperatures (US), and Snow Accumulation.
Example
This code:
mapMenusOptions = {
  hideLayers: ["Visible Clouds", "Satellite Infrared Radar", "Lightning Strikes", "Storm Cells", "Snow Accumulation"],
};
Customizes the default menu to: